
Accounts Receivable on Harbortouch Retail
Description: Learn how Accounts Receivable (A/R) payments are used in HarborTouch Retail to track how much a customer has purchased on their personal account with your location.
A/R Payments
- Access the POS menu.
- Select the customer making the payment from the customer list. This brings up the transaction window.
- On the transaction window, the customer’s current A/R Balance is displayed at the top of the screen. Select [F3] Recall Trns at the bottom of the screen.
- On the transaction list, A/R transactions are colored red, and both the type and reference are labeled 'Invoice.'

- Select the A/R transaction upon which you want to make a payment and press Receive Payment at the bottom of the screen.
- If the customer has multiple A/R transactions, a window displays allowing you to choose which transactions you are making payments on; otherwise, you can proceed directly to the payment window.
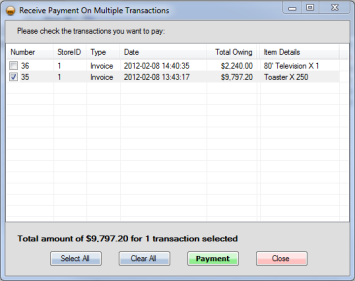
- Use the checkboxes to select which invoices you want to make your payment on.
- Press Payment to continue and process the payment as you would for any transaction.
Returning Items from A/R Transactions
If a customer purchases several items and puts them on A/R, then later wants to return only one or some of the items in that transaction, you can’t simply void the sale as that would remove ALL the items.
- First, access the POS menu.
- Select the customer from the list to proceed to the transaction screen.

- From the transaction window, select [F3] Recall Trns at the bottom of the screen.
- From the transaction list, select the A/R transaction containing the returned item(s). You can use the options at the top of the screen to help sort the list if needed.
- Once you have highlighted the transaction, press Return Items.

- Scan or manually key in the code of the item being returned into the Item Code field.
- Enter the quantity of the item(s) into the Qty field.
- Press Add Item. The Qty To Return column will be adjusted with the new amount, and the item will be colored blue in the list.

- Once all the items being returned have been selected, press Finish, Go Back to Sale, which will send you back to the transaction window.
- Press Payment.
- Now you must select how to credit the customer for the return. The system will not allow you to enter a negative A/R amount, so you must enter the balance into the 'Store Credit' field. Click Complete Transaction to finish.

Once you’ve returned the items, if the customer still has both a negative A/R balance and a positive store credit balance, you have to apply that store credit to the customer’s A/R account. To do so:
- Select the customer from the list.

- Recall the transaction with [F3] Recall Trns at the bottom of the screen.
- Select the original A/R transaction as before, but this time press Receive Payment.

- In the Process Payment window, enter the customer’s store credit balance into the 'Store Credit' field.
- Click Complete Transaction to apply the payment to the customer’s A/R balance.

Aging A/R Interest
A/R interest can be aged from the Customers screen.
- From the Customer screen, press More.

- A popup menu will appear at the button location. Select Age AR Interest from this menu.
- The Age AR Interest window will pop up on your screen.
- The first line in this window will be a note stating the last aged transaction date.
- Enter the Interest Rate (%) that you would like to apply to all customers.
- Select a date from the Age AR Prior To (Inclusive) field; the grace period will be displayed below.
- Select a date from the Interest Transaction Date field.
- Once you have completed your selections, press Now to apply your changes.
- A confirmation will be displayed stating that AR has been aged
- Select OK to finish
Display Customer A/R Balance
- To display the customer A/R balance, select the Customers icon from the main menu.
- Select the customer whose account balance you would like to see. This will be listed in the Current AR Balance field.

- A/R Balance will also be displayed on the transaction screen during a sale.
