
Profile Overview in Shift4 Customer Hub
Description: Learn about your Profile settings in Shift4 Customer Hub, which include your account, users, location, groups, two-factor authentication, and account preferences.

To access your Profile settings, log in to Shift4 Customer Hub and select Profile located on the left navigation menu.
Account
Selecting Account displays your information as the owner of the Customer Hub account. It will show your first and last name by default, as well as the email attached to the account. Changing the Email changes the email used to log in, so you will be logged out after changing emails, requiring you to log in with the new email.
You can also change your Customer Hub password here by entering the current password and then two instances of the new password. Changing the password will log you out and require you to log in using the new password. Select the "Update Account" button at the bottom of the screen to commit any changes.
Users
Selecting Users will allow multiple users, called "sub-users," to be added to one Customer Hub account. This is beneficial if you have multiple partners, managers, or other individuals who would require access to your information within the Customer Hub. To create a new sub-user, select the "+" (plus) icon at the top right corner of the screen. 
Details: Enter the user's first name, last name, and email address to send the registration email.
Locations: Select the Locations dropdown, check the box next to each location that this user has access to within the Customer Hub, and select Apply.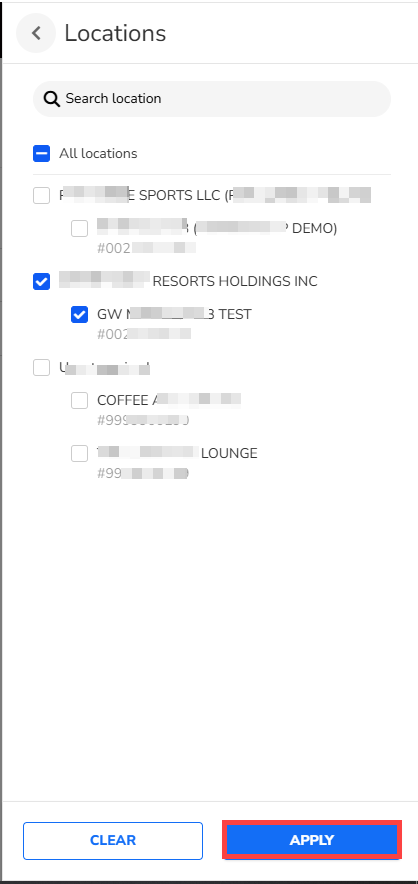.png?revision=1)
Permissions: Customize user permissions by selecting the Permissions dropdown, placing a check mark next to any permissions that you would like the user to have, and selecting Apply.
You can save these permissions as a template so that next time, you can quickly access them and apply them to another user using the "Save As Template" button.
Once all the information is entered, select the Create button, which sends an email to the user with a registration link to create their account.
Locations
Locations allow you to view whether or not you have access to a location..png?revision=1)
Groups
Set up statement or location groups to group multiple MIDs based on specific needs.
Location Groups:
View and filter payment data from multiple locations in one place, making it easier to see information and work more efficiently. You can create, name, and manage location groups, add MIDs from any location, and assign each MID to more than one group.
Statement Groups:
Provide a consolidated monthly statement for multiple locations, making reconciliation easier by combining a summary with detailed views.
- Single Consolidated Statement: Combines financial data for all selected locations.
- Detailed & Aggregated Views: Displays an overall summary alongside individual location details.
- Permissions Required: Only Admins or users with specific permissions can create, edit, or delete statement groups.
- Location Access: The ability to add, view, or manage locations depends on your permissions for those locations.
- One Group per Location: A location cannot be part of more than one statement group.
To create a Location Group:
- Select the "+" (plus) button.
- Select Location Group.

- Enter a unique group name (50 characters max).
- Assign at least 2 MIDs to the group. Use the search feature to find locations by MID or Legal Name.

- Select Save. A confirmation message will appear, and the new group will be visible in the list.

Note: You can have up to 30 active Location Groups. After reaching this limit, you can delete or deactivate an existing group to create a new group.
To create a Statement Group:
- Select the "+" (plus) button.
- Alternatively, from the Statement Page, select the Add/Edit Groups button.

- Alternatively, from the Statement Page, select the Add/Edit Groups button.
- Select Statement Group.

- Enter the Statement Group name.
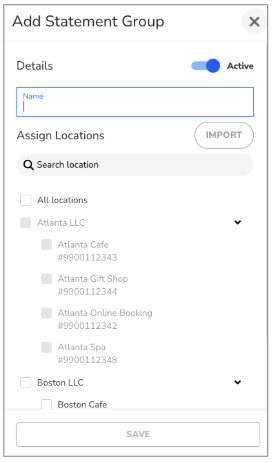
- Assign at least 2 MIDs to the group. Use the search feature to find locations by MID or Legal Name. When selecting locations for a statement group, Users can only add locations that are not already part of another Statement Group.
- Select Save.
Notes:
- Users' ability to add, view, or manage locations within a Statement Group is determined by their access and permissions for those specific locations.
- To create, edit, or delete a Statement Group, a user must either:
- Be an Admin
- Have specific permissions granted to manage groups

To deactivate a Location Group:
- Select the Location Group from the list.
- In the Edit Location Group window:
- Slide the Active toggle off to deactivate the group and select Save.

- Slide the Active toggle off to deactivate the group and select Save.
To delete a Location or Statement Group:
- Select the Location or Statement Group from the list.
- In the Edit Group window, select Delete to remove the group.

An admin user can only see the Groups that they created and whether the groups are active or inactive. They can also view the Group Name, Created/Updated By, Last Updated, and Location Count.
Non-admin users can only see active Groups created by an admin if they have access to at least one location (MID) within the group. They can view the Group settings and search locations, but they do not have edit rights.
Two-Factor Authentication
This section allows you to add an extra layer of security to your account. Once set up, whenever you sign in, you'll need to enter both your password and a security code. Visit the Set up and Use Two-Factor Authentication in Lighthouse Business Manager article for more information on how to set it up.
Account Preferences
You can select your default Home page here. You can choose from Dashboard, Transactions, or Customers. 

Select your desired Home page and select Save.
Localization Enhancements
Note: For information on applying localization to your account after logging in, please visit the Login and Localization Enhancement article.