Shift4 One Settings Guide
Description: Learn about Shift4 One, our standalone payment device that you can use for pickup and delivery, curbside pickup, and more. Shift4 One operates with cellular data so that you can process payments virtually anywhere.
Availability: United States, Canada, Ireland, Spain, United Kingdom
Learn more about the Shift4 One Settings below.
For more information on Shift4 One, visit the Merchant Training - Quick Reference Guide.
Locate Shift4 One Settings
- Open the Shift4 One application.
.png?revision=1)
- Select the hamburger icon (3 horizontal lines) in the top-left corner.
- Navigate to Settings.
Employee
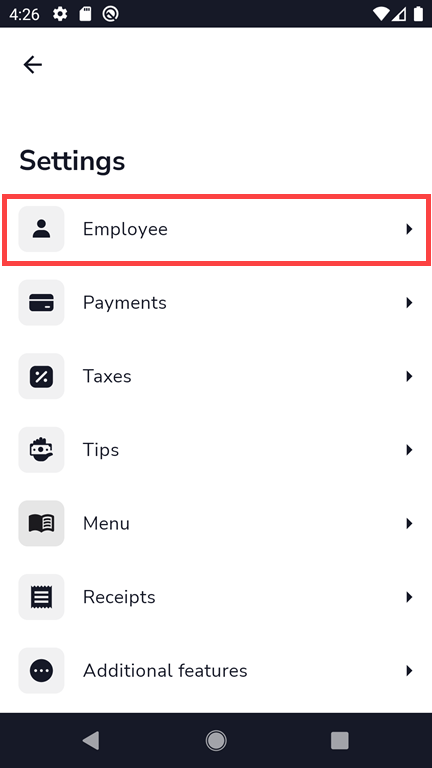
Choose a name that will be displayed on the main screen.
- From the Settings menu, select Employee.
.png?revision=1)
- Provide an entry.
.png?revision=1)
- Press the checkmark icon to complete the entry and go back.
.png?revision=1)
The name displays in the upper left, next to the hamburger menu..png?revision=1)
Payments
From the Settings menu, select Payments.

Set Up Payment Options
- Select Edit next to the applicable payment amount.
.png?revision=1)
- Enter the amount.
- Select Continue to automatically save and display on the main screen among the main payment options.
Enable Go Home After Payment Option
Toggle Go Home Screen After Payment to control whether the device automatically returns to the Home screen after a payment is completed..png?revision=1)
Payment Types
Toggle options including Credit Card, Debit, and Cash.
Note: For additional information, refer to Take a Payment on Shift4 One..png?revision=1)
Taxes
From the Settings menu, select Taxes.

Create New Tax
- Select Create New.
.png?revision=1)
- Set up the tax based on the state
Note: For specific information, refer to Configure Sales Tax in Shift4 One.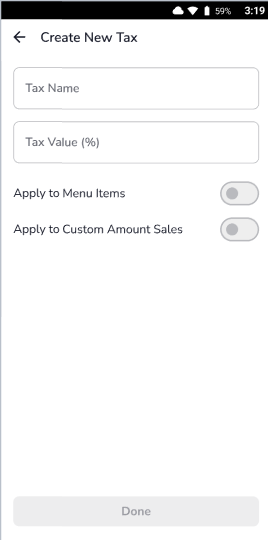.png?revision=1)
Tips
From the Settings menu, select Tips.

- Enable Tipping - Displays the tips on the application during the payment.
Note: It needs to be disabled for tips to be accepted via Receipt. - Enable default tip selection - Designate the tip values for Tip 1, Tip 2, and Tip 3 as the default selection.
- Enable Threshold Amount - Select a Minimum Threshold amount for the tips.
For additional information, please refer to the following resources: - Perform a Tip Adjustment on Shift4 One
Menu
Menu allows you to create and manage items that can be added to transactions. You can manage menu items directly on the device or sync items from Shift4 Dine Customer Hub.
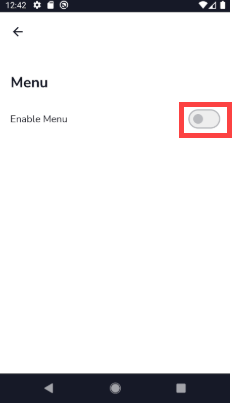
- From the Settings menu, select Menu.

- To enable Menu functionality, slide the Enable Menu toggle on.
.png?revision=1)
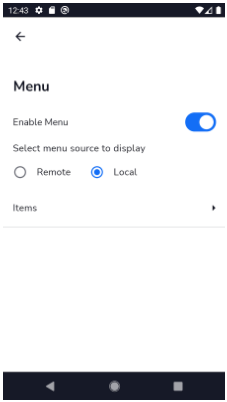
Choose how your menu is managed:
- Remote Menu: Syncs with your existing menu from Shift4 Dine Customer Hub.
- Local Menu: Uses the menu currently stored on the device.
.png?revision=1)
Visit Manage Menus for more details.
Advantage Program
If your business has the Advantage Program, it needs to be set up on the Shift4 One application to be applied to every payment. This can be done from the Settings menu. Make sure to select the correct program and percentage.
From the Settings menu, select Advantage Program:.png?revision=1)
For additional information on configuring Shift4 One, please refer to the following resources:
Additional Features
From the Settings menu, select Additional features.

Here, you can enable:
- Kiosk Mode
- ID Check
- Gift cards
- PIN protection

Note: PIN protection will lock the Settings with a PIN code. To set it up, you will need to enter the default PIN code, which is today’s date in yyyy/mm/dd format.
How to Use the Navigation Buttons
Since the Shift4 One runs on an Android device, it shares the same navigation buttons as other Android devices. Refer to the following information on how to use the Android buttons.
PAX A930
 |
Overview: Shows you all open screens/apps |
 |
Home: Takes you back to the home screen. |
 |
Back: Returns to the previous screen or backs out of the app entirely. |
PAX A800
|
|
Overview: Shows you all open screens/apps |
|
|
Home: Takes you back to the home screen. |
|
|
Back: Returns to the previous screen or backs out of the app entirely. You can press the Back button if you accidentally add the wrong amount. You’ll be prompted if you want to exit the payment flow. Press Exit and you’ll return to the main Shift4 screen. |