
Connect Roles in Enterprise for Appetize
Description: A Connect Role is the permissions established for a user's Connect Account. The role determines if a user has full or no access to Connect pages depending on the options selected.
Access can be toggled on/off in the Connect Role, but the Page Levels will define what functions the user will have for each page.
Create a Connect Role
- Click the Connect Roles icon under the Accounts section on the Corporate Dashboard.
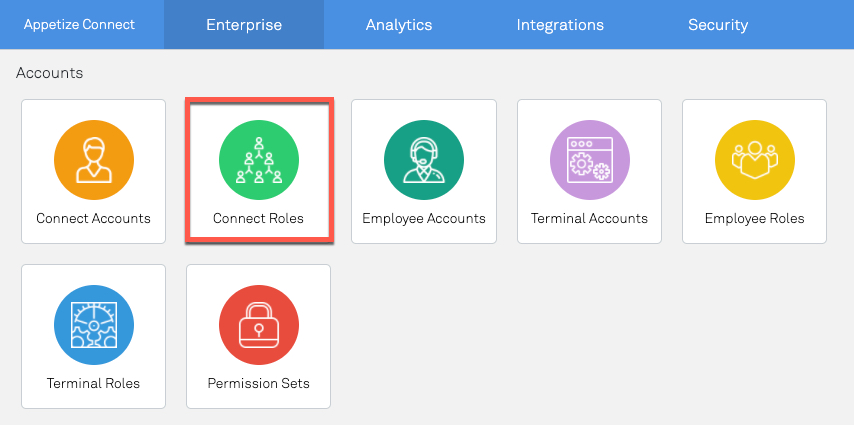
- Select the blue Add Connect Role button in the upper right corner of the screen.
- Enter a name for the Role.
- A recommended practice is to Name the role according to the user's function in the system.
- Ex. Venue Manager, Administrator, Inventory Manager, etc.
- Choose the options that this Connect Role needs to access.
- Toggle options to Yes to allow the user to view that Page.
- Toggle options to No to hide the page from the user.
- At the bottom of the window is a Level dropdown.
- Choose a level between 1 and 10.
- Level 10 is the most restrictive, whereas 1 grants the most access, including everything level 2-10 would have access to.
- These levels are programmed under Page Levels.
- Select the blue Save button to add the Role.
- Once a Role is created, there is an option to Copy or Delete.
- Click on the hamburger icon to export and import Role data.

Configure Role Information
- Search for and select a Connect Role to configure.
- Click Yes under All in the upper right to enable all options.
- Click No under All in the upper right to disable all options.
- Select options individually in the section to toggle.
- If all options in all sections are set to No, the user can only view the Dashboard upon login.

General
- Accounts: Access to view Employee, Terminal, and Kitchen Display System Accounts.
- Accounts Connect: Access to view Connect Accounts.
- Advanced Analytics: Access to all Advanced Analytics (if applicable).
- Cart Actions: This is an upcoming feature.
- Cash Room: Access to view Cash Room module.
- Discounts: Access to view the Discounts/Reduction module used with ActivateX.
- Events: Access to view the event calendar module.
- Favorite Groups: Access to view favorite group configurations used within ActivateX.
- Hawking: Access to view the Hawking module.
- Hierarchies: Corporate-level access for mapping out venue hierarchies.
- Interact Web: Access to view the Interact Web module.
- Items: Access to view the Items tab.
- Layouts: Access to view layouts for seat selections used in Activate Classic and Web.
- Meal Periods: Access to view the Meal Period tab used for reporting.
- It must be enabled under General and Options.
- Orders: Access to view all Orders and Checks.
- Pickup Windows: Access to view Pickup Windows.
- Must be enabled under General and Options.
- Profile: This is an upcoming feature.
- Codes: Access to view the Codes module.
- Restaurants: Access to view the Restaurant module for Table Service to make table layouts.
- Schedule: Used for 3rd party integrations for a timeclock.
- Settings: Access to the Settings tab with options for Venue Configuration, Mobile Ordering, Integrations, Integration Jobs, and Printers.
- Terminals: Corporate-level access to view terminal information.
- Vendors: Access to view the Vendors module.
- Venues: Corporate-level access to view the venues created within that Corporate.

Reports
- All Reports: Enable access to all the canned report options.
- Employee: Access to run all Employee Reports.
- End of Show: Access to run all End of Show Reports.
- Inventory: Access to run all Inventory Reports.
- Live Reports: Access to view the Live Report.
- Mobile Ordering: Access to run all Mobile Ordering Reports (if applicable).
- Vendor: Access to run all Vendor Reports.
- Venue: Access to run all Venue Reports.

Inventory
- All Inventory: Enable access to all Inventory features.
- Distributors: Access to view Distributors.
- Items: Access to view Inventory Items.
- Live Inventory: Access to view Live Inventory.
- Options: Access to view inventory options for Categories, Brands, Units, PO Charges, and GL Account Codes.
- Purchase Orders: Access to view Purchase Orders.
- Settings: Access to Inventory configuration tied to a Vendor Role.
- Transfers: Access to view Transfers.
- True Up Count: Access to perform an Inventory True Up.
- Warehouses: Access to view Warehouse locations.

Options
- All Options: Enable access to all Options in this section.
- Account Group: Access to Account groups.
- Category Group: Access to Category Groups
- Commission Groups: Access to Commission Groups.
- Connect Roles: Access to Connect Roles.
- Custom Fees: Access to view Custom Fees.
- Custom Fields Actions: Access to view Custom Fields.
- Custom Tenders: Access to Custom Tender.
- Day Parts: Access to view Day Parts.
- Discounts: Access to view legacy Discounts.
- Employee Roles: Access to view Employee Roles.
- Favorite Groups: Access to view Favorite Groups.
- Must be enabled under General and Options.
- Item Restrictions: Access to Item Restrictions used for purchasing limitations.
- Meal Periods: Access to view Meal periods for reporting.
- Must be enabled under General and Options.
- Order Types: Access to view Order Types.
- Permissions Sets: Access to view Permissions Sets.
- Pickup Windows: Access to view Pickup Windows.
- Must be enabled under General and Options.
- POS Categories: Access to view POS Categories used in ActivateX.
- Price Levels: Access to view Price Levels.
- Print Groups: Access to view Print Groups.
- Reason Groups: Access to view Reason Groups.
- Reasons: Access to view Reasons.
- Report Category: Access to view Report Categories.
- Tax Groups: Access to view Tax Groups.
- Tax Levels: Access to view Legacy tax levels.
- Tax Rates: Access to view Tax Rates.
- Terminal Roles: Access to view Terminal Roles.
- User Actions: Access to view User Actions.
- Vendor Group: Access to view Vendor Groups.
- Vendor Roles: Access to view Vendor Roles.
- Void Groups: Access to view Void Groups.

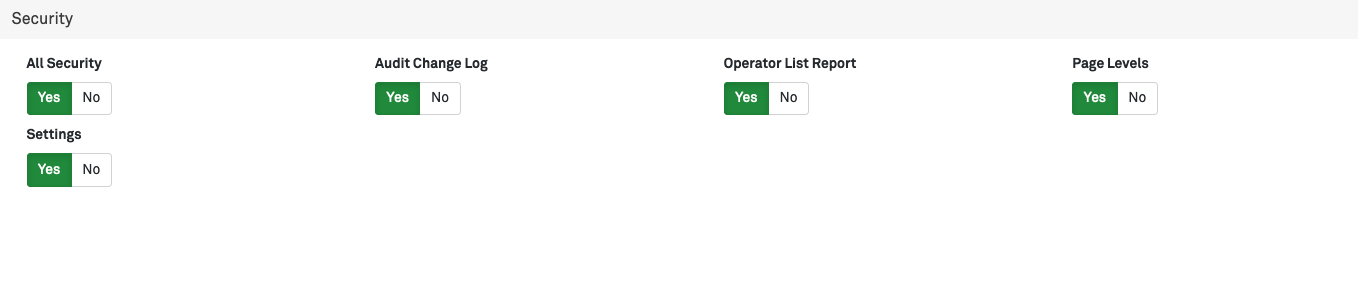
Security
- All Security: Enable access to all Security options in this section.
- Audit Change Log: Upcoming feature to allow access to view history and audit logs.
- Operator List Report: SOX level audit report that shows user actions.
- Page Levels: Access to view Page Levels (used in conjunction with Connect Roles).
- Settings: Access to view Security settings for password restrictions and inactivity timeouts, etc.
Suites
- All Suites: Enable access to all Suites options in this section.
- Access Preorders: Access to view PreOrders.
- Must enable Orders in the Suites section as well to display in Connect.
- Access “Production Units”, “Menus”, Delivery Schedules: Access to view Productions Units, Suites Menus, and Delivery Schedules.
- Must enable for each of the individual options in the Suites section as well to display in Connect.
- Access Reporting: Access to view Suite Reports including Order Reports, Distribution Reports, Production Labels and No Order Report.
- Must enable Reports in the Suites section as well to display in Connect.
- Access Suite Accounts: Access to view Suite Accounts.
- Must enable Accounts in the Suites section as well to display in Connect.
- Accounts: Access to view Accounts.
- Must enable Access Suite Accounts in the Suites section as well to display in Connect.
- Delivery Schedule: Access to view Delivery Schedule.
- Must enable “Production Units”, “Menus”, Delivery Schedules in the Suites section as well to display in Connect.
- Edit PreOrder Cutoff Template: Ability to create a template to cutoff Preorders based on days/times.
- Edit Suites Settings: Access to view Suite Settings
- Must enable Settings in the Suites section as well to display in Connect.
- Enable Pre-Authorization: Access to pre-authorize Suite PreOrders prior to event day.
- Menus: Access to view Suites Menus
- Must enable “Production Units”, “Menus”, Delivery Schedules in the Suites section as well to display in Connect.
- Orders: Access to view PreOrders.
- Must enable Access Preorders in the Suites section as well to display in Connect.
- Production Units: Access to view Production Units.
- Must enable “Production Units”, “Menus”, Delivery Schedules in the Suites section as well to display in Connect.
- Reports: Access to view Reports including Order Reports, Distribution Reports, Production Labels and No Order Report.
- Must enable Access Reporting in the Suites section as well to display in Connect.
- Settings: Access to view Suite Settings.
- Must enable Edit Suites Settings in the Suites section as well to display in Connect.
- Suites: Access to view the programmed Suites.
- View Suite Link: Ability to view the suite preorder URL in Suites settings.

Assign to Venues
- Search for and select a Role to edit.
- Select the Assigned Venues tab.
- Click Add Venue.

- Search for a venue and select Assign to add the Role.
- Use the Assign All or Unassign All for mass updates.

Assign Reports
Each Advanced Analytics report can be enabled or disabled for the Connect Role.
- Select the Assigned Reports tab.

- Click Add Report.
- Search for Reports to Assign or Unassign.
- Use the Assign All or Unassign All for mass updates.

History
The history tab shows a history of changes made to Roles.