
Description: Learn how to set up Online Ordering in Shift4 Dine Customer Hub, including installation, order and payment settings, menu configuration, testing, and launch preparation.
To watch more how-to videos, visit our video section.
Install Online Ordering in Shift4 Dine Customer Hub
- Log in to the Shift4 Dine Customer Hub.
- Select Marketplace on the left navigation bar.

- Locate the Online Ordering app, and select View details.
- Select Install, and follow the prompts.
- After Online Ordering finishes installing, select Online Ordering from My Apps to configure your online ordering settings.

Understand Online Ordering Payment Status Messages
After you install Online Ordering, a yellow status bar may appear at the top of the page while your payments are being set up. Payment setup can take up to 24 hours.

Warning: If a red status bar appears, your payments cannot be set up. Contact Technical Support.
Configure Restaurant Settings for Online Ordering
After you install Online Ordering, the Restaurant Settings tab opens by default. Configure the information customers see for your online store.
Configure the following Restaurant Settings:

- Restaurant Contact Information: Enter the information you want displayed to customers.
- Create a name for your online store.
- Optionally, add a business phone number and email address.
- Select your business time zone.
- Your address is automatically pulled from your account. So, if you need to make any changes, you’ll need to do so separately.
- Order with Google: Toggle "Enable Order with Google" to allow customers to order directly via Google Search and Maps.
- Requires a verified Google Business Profile.
- Set Shift4 as your preferred online ordering partner to ensure top placement, avoid third-party marketplace fees, and integrate orders directly into your Workstation.
- Restaurant Image: Optionally, upload a 500 × 250-pixel image for your restaurant.
Select Save after configuring your Restaurant Settings.
Configure Payment Settings for Online Ordering
Use the Payments tab in Online Ordering to configure payment and tip options for online orders.
Allow Unpaid Online Orders
Enable Allow unpaid orders to let customers submit an online order without making an immediate payment.
You can also create a custom label for unpaid orders.
Allow Gift Card Payments for Online Orders
Enable Allow payments by gift card if customers can use gift cards to pay for online orders.
Credit Card Settings
Require ZIP requires customers to enter the ZIP/postal code associated with their credit card billing address for verification.
Require Address requires customers to enter the full billing address associated with their credit card for verification.
Enable ReCAPTCHA for Online Ordering
Enable ReCAPTCHA Status to add ReCAPTCHA security to Online Ordering.
Configure Tips for Online Orders
Enable Allow tips if you want customers to specify a tip at checkout. You can also select a default tip.
Choose whether taxes are included when Online Ordering calculates suggested tip amounts.

Note: You cannot add a tip to an online order submitted from the Workstation. Enable "Allow tips" to let customers tip at checkout.
Select Save after configuring your payment settings.
To watch more how-to videos, visit our video section.
Configure Takeout and Delivery for Online Ordering
Use the Takeout/Delivery tab in Online Ordering to configure how customers place takeout and delivery orders.
- Go to the Takeout/Delivery tab.
- Select Enable Takeout/Delivery.

- Optionally, select Enable QR Ordering to allow tableside ordering.
- Configure the order, takeout, and delivery settings that apply to your business.

Configure Order Settings for Online Ordering
To watch more how-to videos, visit our video section.
Online Ordering Order Settings control special requests, preparation time, order types, order throttling, surcharges, and order notifications.
| Setting | Required? | Description |
|---|---|---|
| Allow Special Requests | Optional | Allows customers to add custom comments up to 32 characters. Example: “Double bake pizza” or “No onions.” |
| Preparation Time (min) | Optional | Determines how far in advance orders print to the kitchen. Example: If prep time is 15 minutes and pickup is scheduled for 12:00 pm, the order prints at 11:45 am. |
| Order Type | Required | Determines whether you accept Takeout, Delivery, or Both. |
| Order Throttling | Optional | Limit the number of orders that can be fulfilled every 15 minutes to prevent overwhelming the kitchen. |
| Online Order Surcharge Name | Conditional (only required if you enable a related setting) | Sets the name customers see when an online order surcharge applies. |
| Type | Conditional (only required if you enable a related setting) | Sets a flat-dollar or percentage-based surcharge for online orders. |
| Online Order Surcharge Tax | Conditional (only required if you enable a related setting) | Determines whether tax applies to the online order surcharge. |
| Email/SMS Notifications | Optional | Adds contacts who receive notifications for new online orders. Leave this setting blank to disable notifications. |
Configure Takeout Settings for Online Ordering
Online Ordering Takeout Settings control order amount limits and when customers can place takeout orders.

- Min/Max Order Amounts: Set minimum and maximum order amounts for online orders. Leave these fields blank if you do not want to set order limits.
- Future Orders: Determine how far in advance customers can place orders:
- ASAP Only: Customers can only order during your current operating hours.
- Same Day: Customers can place orders earlier in the day. The earliest pickup or delivery time is the store opening time plus the configured preparation time.
- 1–6 Days Out: Customers can schedule orders up to six days in advance (ideal for catering).
Configure Delivery Settings for Online Ordering
Online Ordering Delivery Settings control where you deliver, delivery timing, surcharges, order limits, and future delivery options.

| Setting | Purpose |
|---|---|
| Deliver to Addresses | Enables delivery to customer addresses. Enable Deliver to Addresses or configure at least one Drop-Off Point. |
| Delivery Address Validation | Determines where orders can be delivered. Set delivery availability by drawing a custom zone on the map or by driving distance. |
| Delivery Distance (mi.) | Sets the maximum delivery distance from your business location. |
| Minimum Delivery Time (min) | Sets the minimum time required to deliver an order. |
| Delivery Surcharge Name | Sets the surcharge label customers see, such as Delivery Fee. |
| Type | Sets a flat-dollar or percentage-based delivery surcharge. |
| Delivery Surcharge Tax | Determines whether tax applies to the delivery surcharge. |
| Min/Max Order Amounts ($) | Sets minimum and maximum order amounts for delivery orders. |
| Minimum Delivery Time ($) | Set the shortest window needed to deliver orders. |
| Allow ASAP Orders | Allows customers to request immediate deliveries. |
| Allow Future Orders | Allows customers to schedule deliveries up to six days in advance. |
| Future Orders | Allows customers to schedule future order delivery for the same day or up to 6 days in advance. |
| Drop-off Points | Adds drop-off point information for offices, hotels, or event venues where deliveries can be left. |
Customer View

Delivery Setup Tips
When configuring delivery for Online Ordering:
- Test your delivery configuration by placing a sample order.
- Clearly communicate delivery fees and surcharges to customers during checkout.
- Regularly review delivery zones and Drop-Off Points to account for changes in your business needs or local area.
FAQs
Can I combine Drop-off Points with Deliver to Addresses?
Yes. Online Ordering can use Drop-off Points and Deliver to Addresses simultaneously to provide customers with both delivery options.
What happens if a customer enters an address outside my delivery zone?
If a customer enters an address outside your configured delivery zone, Online Ordering alerts the customer that the address is not serviceable.
How do I edit or remove a Drop-off Point?
Go to the Drop-Off Points section, select the Drop-Off Point you want to edit or delete, and make the applicable changes.
Configure QR Ordering for Online Ordering
To watch more how-to videos, visit our video section.
Online Ordering lets customers place in-restaurant orders using QR codes, reducing the need for staff to enter orders on the Workstation, supporting contactless ordering.
To Enable QR Ordering:
- Go to the QR Ordering tab.
- Select Enable QR Ordering.
- Optionally, enable Allow Special Requests.
- Optionally, enable Allow Ordering Outside of Schedule Hours.
- Configure the applicable QR Ordering settings.
| Setting | Purpose |
|---|---|
| Dine In Surcharge Name | Sets the surcharge label customers see when a dine-in surcharge applies to QR orders. |
| Type | Sets a flat-dollar or percentage-based surcharge for QR orders. |
| URL | Provides the online ordering menu page for customers. |
| QR Code | Provides a QR code that customers can scan to access the same online menu. |
| QR Ordering Table Tent | Downloads an A4 PDF that you can print and place on tables. |
| Create Table Specific QR Codes | Assigns table numbers to individual QR codes so customers do not need to enter their table number. |
Configure Closures for Online Ordering
Use the Closures tab in Online Ordering to configure alternate operating hours, such as closing for a holiday or closing early.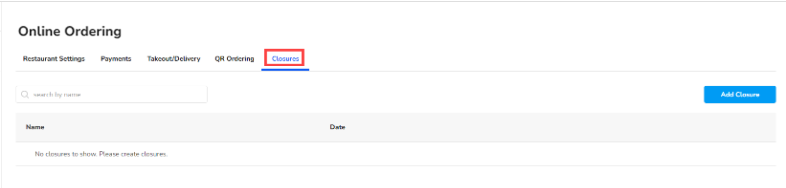
To schedule a new closure:
- Go to the Closures tab.
- Select Add Closure.

- Enter the name for the closure, such as a Holiday.
- Select the start and end dates and times.
- Enter the message customers see when they attempt to place an online order during the closure.
- Select the order types affected by the closure, such as Delivery Orders, Takeout Orders, or Dine In Orders.
- Select Add.
Next, set up your menu(s) via Menu Manager before testing the system.
Note: Shift4 Dine does not support closure configuration for DoorDash, Uber Eats, Grubhub, TakeOut7, FOLOS, and Waitbusters online ordering integrations. To temporarily close online ordering for those integrations, adjust the online ordering schedule in Menu Manager to reflect the closure, and then restore the normal schedule once the closure ends.
Configure an Online Menu in Menu Manager
To watch more how-to videos, visit our video section.
Use Menu Manager in the Customer Hub to configure the items and modifiers available through your Online Ordering integrations.
Important: Menu Manager configuration applies to all Online Ordering integrations available in the Marketplace, such as DoorDash, Uber Eats, Grubhub, TakeOut7, FOLOS, and Waitbusters. Import from the Workstation overrides the Online Ordering integration menus installed on the account, and publishing the Online Menu sends updates to those integrations.
To configure:
- In Shift4 Dine Customer Hub, select Marketplace.
- Select Menu Manager.
- Select Import from POS.

Note: If Import from POS is unavailable, Menu Manager has already been set up and has the latest information from your Workstation. -
Select the items or modifiers you want to add to your online store. You can select:
- All items
- All items in a department
- Individual items

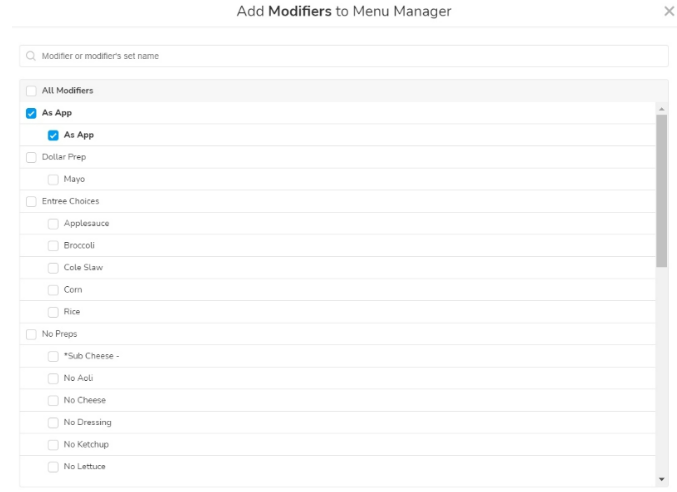
- If you added an item with modifiers, select Next to configure the modifiers.
- Select the modifier sets that are relevant to customers.
- Select Save.
Create an Online Ordering Schedule in Menu Manager
Create at least one schedule in Menu Manager to determine when your online menu items are available. Your store is not ready to accept online orders until you configure a schedule.
A restaurant with the same menu throughout the day may need only one schedule. Restaurants with separate menus, such as lunch and dinner, can create separate schedules with different items and availability.
- In your Menu Manager, select the Schedules tab.
- Select "+" to create a new schedule.
- Enter a schedule name.

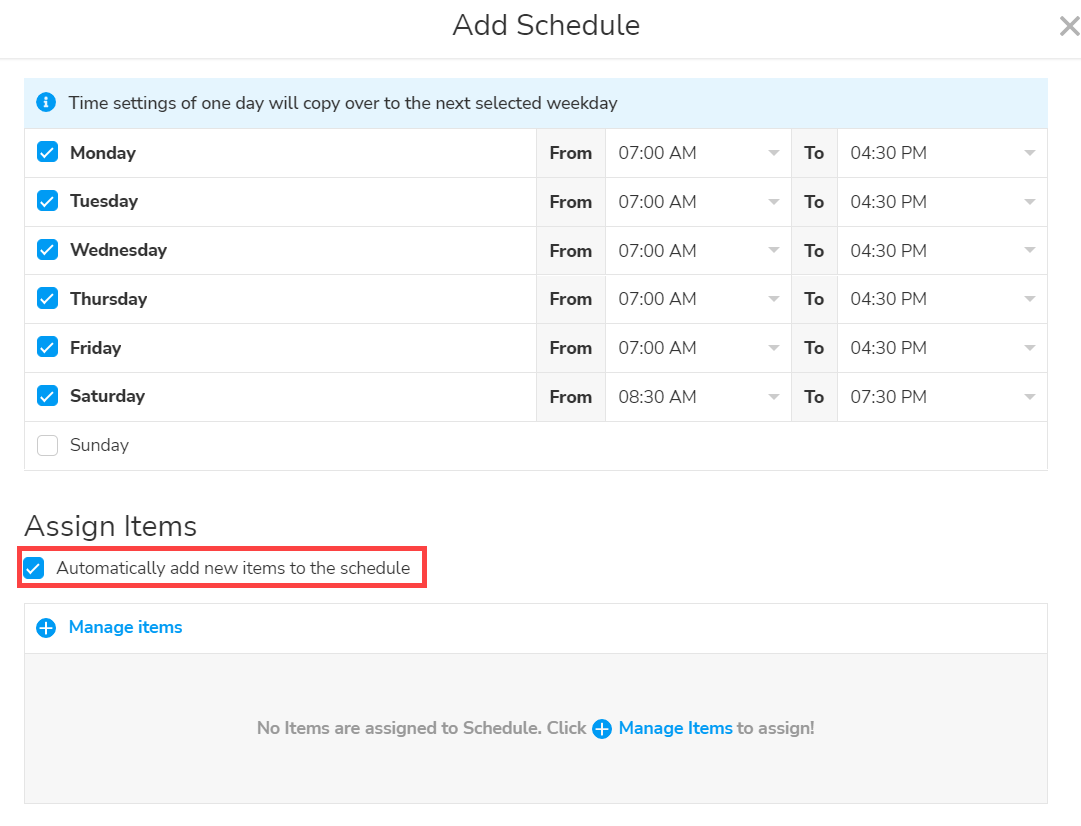
- Select the days when the scheduled items are available online.
- For each selected day, enter the availability times in the From and To fields.
- Optionally, enable Automatically add new items to the schedule.
- Select Manage items.
- Select the items to include in the schedule, or select All Items.
- Select Save.
- Select Add to create the schedule.

- Select the Publish menu button.

Customize the Online Menu in Menu Manager
To watch more how-to videos, visit our video section.
After you configure your online menu, use Menu Manager to customize departments, modifier sets, and items for your online store.
Reorder Modifiers Sets in Menu Manager
- In Menu Manager, select the Menu tab.
- Select Reorder Modifier Sets.

- Use the arrows next to a modifier set to move it to the desired position.

- Select Save.
Reorder Departments in Menu Manager
- Select Reorder Departments.

- Use the arrows next to a department to move it to the desired position.
- Select Save.
Edit an Online Menu Department
- Select the department name.
- Update the department name, online-only name, or description as needed.

- Select Save.
Edit an Online Menu Item
- Expand the applicable department.
- Select the item you want to edit.
- Configure the available Online Ordering integration settings.

Note: The options here will change depending on what integrations you have installed through the Marketplace. This is helpful for items like alcohol, which can be restricted to in-house ordering only. - If applicable, configure an integration-specific item price.

- Assign the item to a schedule, add labels, or enter an online description as needed.

Some integrations, such as alcohol, may support some labels. DoorDash and Uber Eats accept this tag and will check if it is available for delivery and, if so, change the price as needed. These labels can also help your customers identify important information, such as “Gluten Free.”
- Select Upload Photo to add an image for the item.

- Select the image.
- Select Open.
- Crop or adjust the image as needed.

- Select Done.
- Select Save.
- Select Publish menu to send your changes to the online store and applicable integrations.
For information about item availability, visit the Prevent Customers from Ordering Sold Out Items on Online Ordering article.
Configure Online Ordering on the Workstation
Warning: The Online Ordering surcharge does not apply to DoorDash and Uber Eats integrations orders. Any surcharges can be configured directly through the integrations portals.
Configure the Workstation after setting up Online Ordering and your online menu in the Customer Hub.
Create the Online Ordering Surcharge
- On the workstation, navigate to Manager > Settings > Accounting > Surcharge.
- Select Add Surcharge.
- Enter Online Ordering as the surcharge name.
- Set the surcharge to the dollar amount type.
- Enter the surcharge amount that your location has set.

- Select Save.
Note: The Online Ordering surcharge can be added or edited in either Customer Hub > Shift4 Dine > Accounting or Manager > Settings > Accounting > Surcharges on the Workstation. Any changes made in one location will automatically sync to the other.
Configure Marketplace Settings on the Workstation
After creating the Online Ordering surcharge, go to Manager > Settings > Business > Marketplace.
Important: Make sure all required sections, including Paired Tax and Paired Surcharge, are Active. Online Ordering will not work if the required sections are inactive.
Test Online Ordering
Test Online Ordering after configuring Online Ordering, Menu Manager, and the Workstation to verify that online orders are successfully delivered to the Workstation.
- In Shift4 Dine Customer Hub, go to Online Ordering > Takeout/Delivery.
- Select the Online Menu link that customers use to access your store.
- Add several items to an order.
- Select Checkout.
- Enter the requested customer information.
- Submit the order.
- Verify that a ticket for the test order appears on the Workstation.
Note: To avoid charging a credit card during testing, temporarily enable Allow unpaid orders under the Online Ordering payment settings.
On your Workstation, you will see a ticket for your order.
Workstation

Understand Online Ordering Sort Order
Online Ordering uses the global Workstation sort order for:
- Items
- Modifier Sets
- Modifiers
You can change the order of Departments or Categories in Menu Manager > Menu by selecting Reorder Departments.
Understand Workstation Sync With Online Ordering
After you import or add an item through Menu Manager, Online Ordering automatically synchronizes certain Workstation changes for that item.
The following Workstation item fields automatically sync with Online Ordering:
- Active/Inactive status.
- Workstation Item Name.
- Workstation Item Price.
Make Bulk Changes in Menu Manager
Use Menu Manager bulk actions to make the same change to one or more items or modifiers.
- Go to Menu Manager > Menu.

- From Show, select Items or Modifiers.
- Select the items or modifiers you want to update.
- Select Remove or Edit, depending on the change you want to make.
- Complete the applicable changes.
- Select Publish menu to publish the updates.
Note: Bulk actions are useful for removing multiple items or adding tags and labels to multiple menu elements.
Enable Online Ordering
After you complete the Online Ordering setup, enable the online store so customers can place orders.
- Select Save.
- Select Enable Online Ordering.
- After Online Ordering is enabled and your menu is published, select Menu URL to open the customer-facing ordering page.

- Copy the Menu URL, and add it to your website, social media, or other customer-facing channels.
Orders that customers place online automatically appear on your Workstation.
Promote Online Ordering
After you enable and test Online Ordering, share your online store with customers.
You can:
- Add the Online Ordering link to your website
- Share the Online Ordering link on social media
- Add Online Ordering information to customer receipts
